
Chapter 67
Deploying an Agent with Agent Engine and MCP Toolbox for Databases
# Copyright 2025 Google LLC
#
# Licensed under the Apache License, Version 2.0 (the "License");
# you may not use this file except in compliance with the License.
# You may obtain a copy of the License at
#
#     https://www.apache.org/licenses/LICENSE-2.0
#
# Unless required by applicable law or agreed to in writing, software
# distributed under the License is distributed on an "AS IS" BASIS,
# WITHOUT WARRANTIES OR CONDITIONS OF ANY KIND, either express or implied.
# See the License for the specific language governing permissions and
# limitations under the License.
Deploying an Agent with Agent Engine and MCP Toolbox for Databases
Share to:
| Author |
|---|
| Shawn Yang |
Overview
Agent Engine in Vertex AI
Agent Engine is a managed service that helps you to build and deploy an agent framework. It gives you the flexibility to choose how much reasoning you want to delegate to the LLM and how much you want to handle with customized code. You can define Python functions that get used as tools via Gemini Function Calling. Agent Engine integrates closely with the Python SDK for the Gemini model in Vertex AI, and it can manage prompts, agents, and examples in a modular way. Agent Engine is compatible with LangChain, LlamaIndex, or other Python frameworks.
MCP Toolbox for Databases
MCP Toolbox for Databases is an open source MCP server for databases. It was designed with enterprise-grade and production-quality in mind. It enables you to develop tools easier, faster, and more securely by handling the complexities such as connection pooling, authentication, and more.
Objectives
In this tutorial, you will learn how to build and deploy an agent (model, tools, and reasoning) using the Vertex AI SDK and MCP Toolbox for Databases.
You'll build and deploy an agent that uses the Gemini model, Python functions as tools, and LangGraph for orchestration.
You will complete the following tasks:
- Install the Vertex AI SDK for Python
- Use the LangGraph to build components of a simple agent
- Deploy a PostgreSQL database using Cloud SQL.
- Deploy Toolbox for Databases using Cloud Run
- Test your agent locally before deploying
- Deploy and test your agent remotely
Costs
This tutorial uses billable components of Google Cloud:
Vertex AI(for Agent Engine)Cloud Run(for MCP Toolbox for Databases)Cloud SQL(for PostgreSQL DB)
Learn about Vertex AI pricing, Cloud Run pricing, Cloud SQL for PostgreSQL pricing and use the Pricing Calculator to generate a cost estimate based on your projected usage.
Getting Started
Install libraries
Install necessary libraries for Vertex AI Agent Engine, LangChain, Toolbox, and Cloud SQL integration.
%pip install -q -U \
    "google-cloud-aiplatform[agent_engines,langchain]" \
    toolbox-langchain \
    "langchain-google-cloud-sql-pg>=0.10.0"
Set up global parameters
# @title Required User Input:
# Please update these values for your environment.
# fmt: off
PROJECT_ID = "[your-project-id]"  # @param {type:"string"} Your Google Cloud Project ID.
STAGING_BUCKET_NAME = "[your-staging-bucket-name]"  # @param {type:"string"} Name (only) of your GCS bucket for staging.
# fmt: on
PASSWORD = input(
    "Please provide a password to be used for the 'postgres' database user: "
) # Securely input the database password.# @title Tutorial Defaults:
# These parameters are pre-configured for this tutorial. Usually keep these unless you have specific needs.
# fmt: off
REGION = "us-central1" # @param {type:"string"} The region where resources will be created.
INSTANCE = "hotel-booking-instance" # @param {type:"string"} Name for the Cloud SQL instance.
DATABASE = "postgres" # @param {type:"string"} Name for the database within the instance.
TABLE_NAME = "hotels" # @param {type:"string"} Name for the table to be created.
USER = "postgres" # @param {type:"string"} Database admin username.
TOOLBOX_SERVICE_ACCOUNT = "toolbox-identity" # @param {type:"string"} Name for the toolbox service account.
# fmt: on# @title Automatically Derived Parameters
# These are constructed based on your input and defaults.
STAGING_BUCKET = f"gs://{STAGING_BUCKET_NAME}"
TOOLBOX_SERVICE_ACCOUNT_MEMBER = (
f"serviceAccount:{TOOLBOX_SERVICE_ACCOUNT}@{PROJECT_ID}.iam.gserviceaccount.com"
)Getting Started With Gen AI Toolbox Locally
Please follow the guide in https://github.com/googleapis/genai-toolbox/blob/main/docs/en/getting-started/colab_quickstart.ipynb
This guide demonstrates how to quickly run Toolbox end-to-end in Google Colab using Python, PostgreSQL, Google Gen AI and LangGraph or Llamaindex. Including:
- Set up a
PostgreSQL database. - Launch a Toolbox server.
- Connect to Toolbox and develop a sample
Hotel Bookingagent.
Here is the simplified flow of a Toolbox Application:
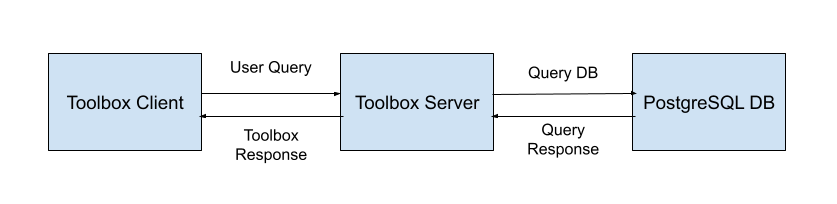
This notebook will reuse the example from the previous one, but demonstrate remote deployment.
Deploy PostgreSQL DB Remotely using Cloud SQL
In the previous toolbox quick-start notebook, we demonstrated setting up a PostgreSQL database locally and populating it with data. In this notebook, we will show you how to deploy your PostgreSQL database remotely using Cloud SQL.
If you previously learned how to create a PostgreSQL database using the guide at https://colab.sandbox.google.com/github/GoogleCloudPlatform/generative-ai/blob/main/gemini/agent-engine/tutorial_cloud_sql_pg_rag_agent.ipynb, feel free to skip Step 1 and Step 2 below, and proceed directly to Step 3 to populate the data.
Step 1: Before you begin
- In the Google Cloud console, on the project selector page, select or create a Google Cloud project.
- Make sure that billing is enabled for your Google Cloud project.
Required roles
To get the permissions that you need to complete the tutorial, ask your administrator to grant you the Owner (roles/owner) IAM role on your project. For more information about granting roles, see Manage access.
Define project information
Initialize gcloud with your Project ID and resource location. At this time, only us-central1 is supported.
!gcloud config set project {PROJECT_ID}Enable APIs
This tutorial uses the following billable components of Google Cloud, which you'll need to enable for this tutorial:
!gcloud services enable aiplatform.googleapis.com sqladmin.googleapis.com servicenetworking.googleapis.comStep 2: Set up Cloud SQL
Use the provided variable names or update the values to use a pre-existing Cloud SQL instance.
Create a Cloud SQL instance
This tutorial requires a Cloud SQL instance with public IP enabled.
# Create Cloud SQL instance
!gcloud sql instances create {INSTANCE} \
  --database-version=POSTGRES_15 \
  --region={REGION} \
  --project={PROJECT_ID} \
  --root-password={PASSWORD} \
  --cpu=1 \
  --memory=4GB \
  --assign-ip \
  --database-flags=cloudsql.iam_authentication=On
Create a database
Create a new database for the application using the Cloud SQL for LangChain library to establish a connection pool using the PostgresEngine.
By default, IAM database authentication will be used as the method of database authentication. This library uses the IAM principal belonging to the Application Default Credentials (ADC) sourced from the environment.
However, to smooth the onboarding process this tutorial will use the built-in database authentication using a username and password to access the Cloud SQL database can also be used.
from sqlalchemy import textengine = await PostgresEngine.afrom_instance(
PROJECT_ID,
REGION,
INSTANCE,
database=DATABASE,
user=USER,
password=PASSWORD,
)Step 3: Populate Data
In the previous toolbox quick-start notebook, we demonstrated how to populate data for the Hotel Booking Agent.
We will reuse the sql query and populate data in Cloud SQL for PostgreSQL DB.
async with engine._pool.connect() as conn:
    await conn.execute(text("COMMIT"))
    await conn.execute(
        text(
            f"""
            CREATE TABLE {TABLE_NAME}(
              id            INTEGER NOT NULL PRIMARY KEY,
              name          VARCHAR NOT NULL,
              location      VARCHAR NOT NULL,
              price_tier    VARCHAR NOT NULL,
              checkin_date  DATE    NOT NULL,
              checkout_date DATE    NOT NULL,
              booked        BIT     NOT NULL
            );
            """
        )
)async with engine._pool.connect() as conn:
await conn.execute(text("COMMIT"))
await conn.execute(
text(
f"""
INSERT INTO {TABLE_NAME}(id, name, location, price_tier, checkin_date, checkout_date, booked)
VALUES
(1, 'Hilton Basel', 'Basel', 'Luxury', '2024-04-22', '2024-04-20', B'0'),
(2, 'Marriott Zurich', 'Zurich', 'Upscale', '2024-04-14', '2024-04-21', B'0'),
(3, 'Hyatt Regency Basel', 'Basel', 'Upper Upscale', '2024-04-02', '2024-04-20', B'0'),
(4, 'Radisson Lucerne', 'Lucerne', 'Midscale', '2024-04-24', '2024-04-05', B'0'),
(5, 'Best Western Bern', 'Bern', 'Upper Midscale', '2024-04-23', '2024-04-01', B'0'),
(6, 'InterContinental Geneva', 'Geneva', 'Luxury', '2024-04-23', '2024-04-28', B'0'),
(7, 'Sheraton Zurich', 'Zurich', 'Upper Upscale', '2024-04-27', '2024-04-02', B'0'),
(8, 'Holiday Inn Basel', 'Basel', 'Upper Midscale', '2024-04-24', '2024-04-09', B'0'),
(9, 'Courtyard Zurich', 'Zurich', 'Upscale', '2024-04-03', '2024-04-13', B'0'),
(10, 'Comfort Inn Bern', 'Bern', 'Midscale', '2024-04-04', '2024-04-16', B'0');
"""
)
)async with engine._pool.connect() as conn:
await conn.execute(text("COMMIT"))
result = await conn.execute(text(f"SELECT * from {TABLE_NAME};"))
print(result.fetchall())Notice, the Hotel Booking agent will update the remote database, please run the following repopulate_date() before repeated run.
# @title `repopulate_data` function
def repopulate_data():
async with engine._pool.connect() as conn:
await conn.execute(text("COMMIT"))
await conn.execute(text(f"DROP TABLE {TABLE_NAME};"))
async with engine._pool.connect() as conn:
await conn.execute(text("COMMIT"))
await conn.execute(
text(
f"""
CREATE TABLE {TABLE_NAME}(
id INTEGER NOT NULL PRIMARY KEY,
name VARCHAR NOT NULL,
location VARCHAR NOT NULL,
price_tier VARCHAR NOT NULL,
checkin_date DATE NOT NULL,
checkout_date DATE NOT NULL,
booked BIT NOT NULL
);
"""
)
)
async with engine._pool.connect() as conn:
    await conn.execute(text("COMMIT"))
    result = await conn.execute(text(f"SELECT * from {TABLE_NAME};"))
print(result.fetchall())Step 4: Create a user
Set up the AI Platform Agent Engine Service Agent service account (service-PROJECT_NUMBER@gcp-sa-aiplatform-re.iam.gserviceaccount.com) as a database user - to log into the database, a database client - to connect to the database, and an AI Platform user - to connect to Vertex AI models.
# Define service account
PROJECT_NUMBER = !gcloud projects describe {PROJECT_ID} --format="value(projectNumber)"
SERVICE_ACCOUNT = f"service-{PROJECT_NUMBER[0]}@gcp-sa-aiplatform-re.iam.gserviceaccount.com"
IAM_USER = SERVICE_ACCOUNT.replace(".gserviceaccount.com", "")

# Force the creation of the AI Platform service accounts
# The service accounts will be created at deploy time if not pre-created
!gcloud beta services identity create --service=aiplatform.googleapis.com --project={PROJECT_ID}

# Add a service account as database IAM user
# For an IAM service account, supply the service account's address without the .gserviceaccount.com
!gcloud sql users create {IAM_USER} \
  --instance={INSTANCE} \
  --project={PROJECT_ID} \
  --type=cloud_iam_service_account

# Grant IAM Permissions for database-user authentication
!gcloud projects add-iam-policy-binding {PROJECT_ID} \
    --member=serviceAccount:{SERVICE_ACCOUNT} \
    --role=roles/cloudsql.instanceUser

# Grant IAM permissions to access Cloud SQL instances
!gcloud projects add-iam-policy-binding {PROJECT_ID} \
    --member=serviceAccount:{SERVICE_ACCOUNT} \
    --role=roles/cloudsql.client

# Grant IAM permissions to access AI Platform services
!gcloud projects add-iam-policy-binding {PROJECT_ID} \
    --member=serviceAccount:{SERVICE_ACCOUNT}  \
    --role=roles/aiplatform.user

!gcloud projects add-iam-policy-binding {PROJECT_ID} \
    --member=serviceAccount:{SERVICE_ACCOUNT}  \
--role=roles/serviceusage.serviceUsageConsumer# Grant access of table to IAM users
engine = await PostgresEngine.afrom_instance(
PROJECT_ID, REGION, INSTANCE, DATABASE, user=USER, password=PASSWORD
)
async with engine._pool.connect() as conn:
await conn.execute(text(f'GRANT SELECT ON {TABLE_NAME} TO "{IAM_USER}";'))Deploy Toolbox to Cloud Run Remotely
Please follow the guide in https://googleapis.github.io/genai-toolbox/how-to/deploy_toolbox/.
This guide demonstrates how to deploy your toolbox to Cloud Run.
Step 1: Enable APIs
This tutorial uses the following billable components of Google Cloud, which you'll need to enable for this tutorial:
!gcloud config set project {PROJECT_ID}!gcloud services enable run.googleapis.com \
cloudbuild.googleapis.com \
artifactregistry.googleapis.com \
iam.googleapis.com \
secretmanager.googleapis.comTo create an IAM account, you must have the following IAM permissions (or roles):
Create Service Account role (roles/iam.serviceAccountCreator)To create a secret, you must have the following roles:
Secret Manager Admin role (roles/secretmanager.admin)To deploy to Cloud Run, you must have the following set of roles:
Cloud Run Developer (roles/run.developer)
Service Account User role (roles/iam.serviceAccountUser)!gcloud iam service-accounts create {TOOLBOX_SERVICE_ACCOUNT}!gcloud projects add-iam-policy-binding {PROJECT_ID} \
--member {TOOLBOX_SERVICE_ACCOUNT_MEMBER} \
--role roles/secretmanager.secretAccessor!gcloud beta run services add-iam-policy-binding \
--region=us-central1 \
--member=allUsers \
--role=roles/run.invoker toolbox# Grant IAM Permissions for database-user authentication
!gcloud projects add-iam-policy-binding {PROJECT_ID} \
--member={TOOLBOX_SERVICE_ACCOUNT_MEMBER} \
--role=roles/cloudsql.instanceUser
# Grant the Toolbox Service Account permission to connect to the Cloud SQL instance
!gcloud projects add-iam-policy-binding {PROJECT_ID} \
--member={TOOLBOX_SERVICE_ACCOUNT_MEMBER} \
--role=roles/cloudsql.clientStep 2: Create the configure for Toolbox
Following the schema defined at https://googleapis.github.io/genai-toolbox/resources/sources/, create a Toolbox configuration file (e.g., tools.yml).
# Create a tools file at runtime.
# You can also upload a tools file and use that to run toolbox.
tools_file_name = "tools.yml"
file_content = rf"""
sources:
  my-cloud-sql-source:
    kind: cloud-sql-postgres
    project: {PROJECT_ID}
    region: {REGION}
    instance: {INSTANCE}
    database: {DATABASE}
    user: {USER}
    password: {PASSWORD}


tools:
  search-hotels-by-name:
    kind: postgres-sql
    source: my-cloud-sql-source
    description: Search for hotels based on name.
    parameters:
      - name: name
        type: string
        description: The name of the hotel.
    statement: SELECT * FROM hotels WHERE name ILIKE '%' || \$1 || '%';
  search-hotels-by-location:
    kind: postgres-sql
    source: my-cloud-sql-source
    description: Search for hotels based on location.
    parameters:
      - name: location
        type: string
        description: The location of the hotel.
    statement: SELECT * FROM hotels WHERE location ILIKE '%' || \$1 || '%';
  book-hotel:
    kind: postgres-sql
    source: my-cloud-sql-source
    description: >-
       Book a hotel by its ID. If the hotel is successfully booked, returns a NULL, raises an error if not.
    parameters:
      - name: hotel_id
        type: string
        description: The ID of the hotel to book.
    statement: UPDATE hotels SET booked = B'1' WHERE id = \$1;
  update-hotel:
    kind: postgres-sql
    source: my-cloud-sql-source
    description: >-
      Update a hotel's check-in and check-out dates by its ID. Returns a message
      indicating  whether the hotel was successfully updated or not.
    parameters:
      - name: hotel_id
        type: string
        description: The ID of the hotel to update.
      - name: checkin_date
        type: string
        description: The new check-in date of the hotel.
      - name: checkout_date
        type: string
        description: The new check-out date of the hotel.
    statement: >-
      UPDATE hotels SET checkin_date = CAST(\$2 as date), checkout_date = CAST(\$3
      as date) WHERE id = \$1;
  cancel-hotel:
    kind: postgres-sql
    source: my-cloud-sql-source
    description: Cancel a hotel by its ID.
    parameters:
      - name: hotel_id
        type: string
        description: The ID of the hotel to cancel.
    statement: UPDATE hotels SET booked = B'0' WHERE id = \$1;
"""# Write the file content into the tools file.
! echo "{file_content}" > "{tools_file_name}"TOOLS_FILE_PATH = f"/content/{tools_file_name}"Step 3: Deploy to Cloud Run
Upload tools.yaml as a secret:
!gcloud secrets create tools --data-file={TOOLS_FILE_PATH}Set an environment variable to the container image that you want to use for cloud run:
IMAGE = "us-central1-docker.pkg.dev/database-toolbox/toolbox/toolbox:latest"Deploy Toolbox to Cloud Run using the following command:
!gcloud run deploy toolbox \
    --image {IMAGE} \
    --service-account toolbox-identity \
    --region us-central1 \
    --set-secrets "/app/tools.yaml=tools:latest" \
    --args="--tools_file=/app/tools.yaml","--address=0.0.0.0","--port=8080" \
    --allow-unauthenticated
Step 4: Connecting with Toolbox Client SDK
You should get a service URL like: https://toolbox-[project-number].us-central1.run.app
If not, run the following to get the url:
!gcloud run services describe toolbox --format 'value(status.url)'# @title Set up Toolbox Service URL Parameters
# fmt: off
TOOLBOX_ENDPOINT = "[your-toolbox-service-url]" # @param {type:"string"} Your Toolbox Service URL.
# fmt: onTest the connection.
from toolbox_langchain import ToolboxClient

toolbox = ToolboxClient(TOOLBOX_ENDPOINT)
toolbox.load_toolset()
Develop and Test your Agent
Step 1: Develop the Hotel Booking Agent
This section follows the MCP toolbox for databases quick-start to build a hotel booking agent, and demonstrates how to wrap your hotel booking agent into a Python class that is deployable on Agent Engine.
First, we define the class as follows:
class HotelBookingAgent:
    def __init__(
        self, model: str, project: str, location: str, toolbox_endpoint: str
    ) -> None:
        self.model = model
        self.project_id = project
        self.location = location
        self.toolbox_endpoint = toolbox_endpoint
        self.prompt = """
          You're a helpful hotel assistant. You handle hotel searching, booking and
          cancellations. When the user searches for a hotel, mention its name, id,
          location and price tier. Always mention hotel id while performing any
          searches. This is very important for any operations. For any bookings or
          cancellations, please provide the appropriate confirmation. Be sure to
          update checkin or checkout dates if mentioned by the user.
          Don't ask for confirmations from the user.
        """

    # The set_up method is used to define application initialization logic
    def set_up(self) -> None:
        from langchain_google_vertexai import ChatVertexAI
        from langgraph.checkpoint.memory import MemorySaver
        from langgraph.prebuilt import create_react_agent
        from toolbox_langchain import ToolboxClient

        # Create an LLM to bind with the agent.
        model = ChatVertexAI(model_name=self.model, project=self.project_id)

        # Load the tools from the Toolbox server
        client = ToolboxClient(self.toolbox_endpoint)
        tools = client.load_toolset()

        # Create a ReAct agent
        self.runnable = create_react_agent(model, tools, checkpointer=MemorySaver())

    # The query method will be used to send inputs to the agent
    def query(self, message: str):
        """Query the application.

        Args:
            message: The user message.

        Returns:
            str: The LLM response.
        """
        config = {"configurable": {"thread_id": "thread-1"}}
        inputs = {"messages": [("user", self.prompt + message)]}
        response = self.runnable.invoke(inputs, stream_mode="values", config=config)

        return response["messages"][-1].content
Next, we initialize the agent as follows:
agent = HotelBookingAgent(
    model="gemini-2.0-flash",
    toolbox_endpoint=TOOLBOX_ENDPOINT,
    project=PROJECT_ID,
    location=REGION,
)
Finally, we set up the agent before testing it locally:
agent.set_up()Step 2: Test the agent locally
Your local Hotel Booking Agent will process user's query, make tool calls to the remote Toolbox service, which in turn will execute SQL queries against the remote Cloud SQL database.
queries = [
    "Find hotels in Basel with Basel in its name.",
    "Can you book the Hilton Basel for me?",
    "Oh wait, this is too expensive. Please cancel it and book the Hyatt Regency instead.",
    "My check in dates would be from April 10, 2024 to April 19, 2024.",
]
Notice, the following command will update the remote database, if you want to repeat your query, please run repopulate_date() before repeated run.
for query in queries:
    response = agent.query(message=query)
    print(response)
Expected output:
I found the following hotels in Basel: Hilton Basel (ID: 1), Hyatt Regency Basel (ID: 3), and Holiday Inn Basel (ID: 8).

OK. I have booked the Hilton Basel (ID: 1) for you.

OK. I have cancelled the Hilton Basel (ID: 1) and booked the Hyatt Regency (ID: 3) for you.

OK. I have updated your check-in date to April 10, 2024 and check-out date to April 19, 2024 for the Hyatt Regency (ID: 3).
Deploy your agent to Agent Engine Remotely
Now that you've specified a model, tools, and reasoning for your agent and tested it out, you're ready to deploy your agent as a remote service in Vertex AI!
Here, you'll use the Vertex AI SDK for Agent Engine, which brings together the model, tools, and reasoning that you've built up so far.
Step 1: Create a Cloud Storage bucket
Create or reuse and existing Cloud Storage bucket. Agent Engine stages the artifacts of your applications in a Cloud Storage bucket as part of the deployment process.
# Create a Cloud Storage bucket, if it doesn't already exist
!gsutil mb -c standard {STAGING_BUCKET}
Step 2: Initialize the Vertex AI SDK for Agent Engine
Initialize the Vertex AI SDK for Agent Engine with your project, location, and Cloud Storage bucket. Check out the https://cloud.google.com/vertex-ai/generative-ai/docs/agent-engine/set-up#sdk for more details.
import vertexai
from google.colab import auth
from vertexai import agent_engines

auth.authenticate_user()

vertexai.init(
    project=PROJECT_ID,
    location=REGION,
    staging_bucket=STAGING_BUCKET,
)
Step 3: Deploy your agent remotely
Now that you've specified a model, tools, and reasoning for your agent and tested it out, you're ready to deploy your agent as a remote service in Vertex AI!
remote_agent = agent_engines.create(
    HotelBookingAgent(
        model="gemini-2.0-flash",
        toolbox_endpoint=TOOLBOX_ENDPOINT,
        project=PROJECT_ID,
        location=REGION,
    ),
    requirements=[
        "toolbox-langchain==0.1.0",
        "google-cloud-aiplatform[agent_engines,langchain]==1.87.0",
    ],
    display_name="HotelBookingAgent",
)
Step 4: Test the Deployed Agent.
Now you have all PostgreSQL DB, Toolbox and Hotel Booking Agent deployed remotely!
Your remote Hotel Booking Agent will process user's query, make tool calls to the remote Toolbox service, which in turn will execute SQL queries against the remote Cloud SQL database.
Notice, the following command will update the remote database, please call repopulate_date() before repeated run.
for query in queries:
    response = remote_agent.query(message=query)
    print(response)
Expected output:
I found the following hotels in Basel: Hilton Basel (ID: 1), Hyatt Regency Basel (ID: 3), and Holiday Inn Basel (ID: 8).

OK. I have booked the Hilton Basel (ID: 1) for you.

OK. I have cancelled the Hilton Basel (ID: 1) and booked the Hyatt Regency (ID: 3) for you.

OK. I have updated your check-in date to April 10, 2024 and check-out date to April 19, 2024 for the Hyatt Regency (ID: 3).
Querying your deployed agent
You've now deployed your agent and can interact with it in multiple ways, both within this notebook and from other applications or environments. The primary methods for accessing your deployed agent are via the Python client library or through REST API calls. Here's an overview of both methods:
Method 1: Reusing within this notebook or another Python environment
You can directly reuse and query the remote_agent instance you created in this notebook.
Or, you can instantiate a new instance in another notebook or Python script. To do this, you'll need to retrieve your deployed agent's resource name that uniquely identifies your agent, which is a string that includes the project, location, and Agent Engine ID. You can retrieve it by running the following code in the notebook or environment where you created your agent:
remote_agent.resource_nameUse the resource name to load the agent in your other notebook or Python script, then query the remote agent as usual:
# from vertexai import agent_engines

# AGENT_ENGINE_RESOURCE_NAME = "YOUR_AGENT_ENGINE_RESOURCE_NAME"  # Replace with the resource name of your deployed Agent Engine

# remote_agent = agent_engines.get(AGENT_ENGINE_RESOURCE_NAME)
# response = remote_agent.query(input=query)
Method 2: Accessing from other environments via REST API
Beyond the Python client library, your deployed Vertex AI agent can be queried using REST API calls, including:
- Python: You can use Python's
requestslibrary or similar tools to make HTTP calls to the Vertex AI REST API. - cURL: A command-line tool, cURL allows you to send HTTP requests directly. This is useful for testing and debugging.
- Other Programming Languages: If you prefer a different language for your application, you can use its native HTTP client library to make REST API calls.
In summary, you have access to your deployed agent through the Python client library within Python environments, and more universally through its REST API via tools and programming languages of your choosing.
Cleaning up
After you've finished, it's a good practice to clean up your cloud resources. You can delete the deployed Agent Engine instance to avoid any unexpected charges on your Google Cloud account.
Deleting the project
The easiest way to eliminate billing is to delete the project that you created for the tutorial.
- In the Google Cloud console, go to the Manage resources page.
- In the project list, select the project that you want to delete, and then click Delete.
- In the dialog, type the project ID, and then click Shut down to delete the project.
Deleting tutorial resources
Delete the Agent Engine instance(s) and Cloud SQL instance.
# Delete the Agent Engine instance
remote_agent.delete()# Or delete all Agent Engine apps
apps = remote_agent.list()
for app in apps:
app.delete()# Delete the Toolbox Cloud Run instance
!gcloud run services delete toolbox --region={REGION} --quiet# Delete the Cloud SQL instance
!gcloud sql instances delete {INSTANCE} \
--project={PROJECT_ID}