
Chapter 01
Using AWS EC2 Instances
Using AWS EC2 Instances
In this section, we will show you how to install all libraries on a raw Linux machine. Recall that in sec_sagemaker we discussed how to use Amazon SageMaker, while building an instance by yourself costs less on AWS. The walkthrough includes three steps:
- Request for a GPU Linux instance from AWS EC2.
- Install CUDA (or use an Amazon Machine Image with preinstalled CUDA).
- Install the deep learning framework and other libraries for running the code of the book.
This process applies to other instances (and other clouds), too, albeit with some minor modifications. Before going forward, you need to create an AWS account, see sec_sagemaker for more details.
Creating and Running an EC2 Instance
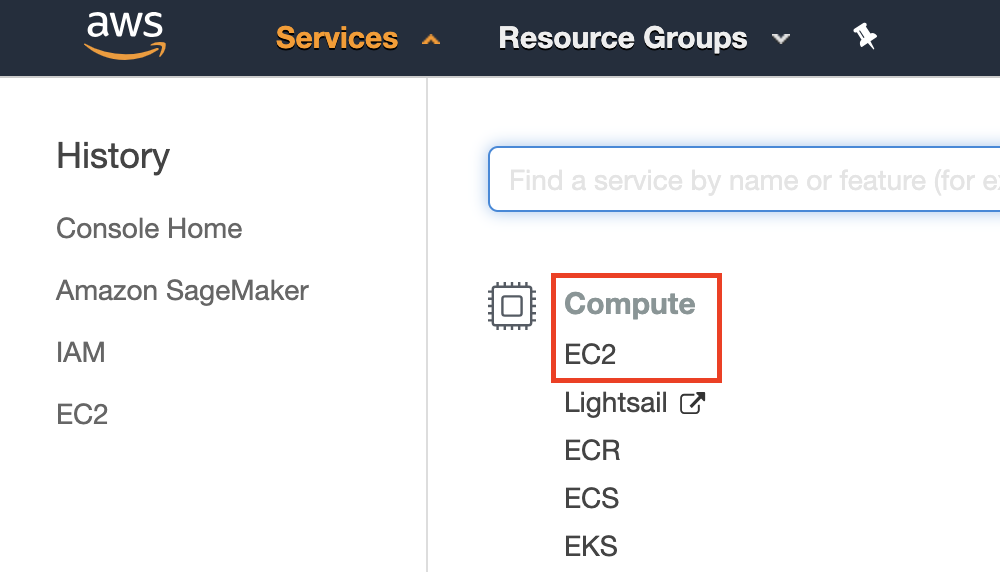
After logging into your AWS account, click "EC2" (marked by the red box in fig_aws) to go to the EC2 panel.
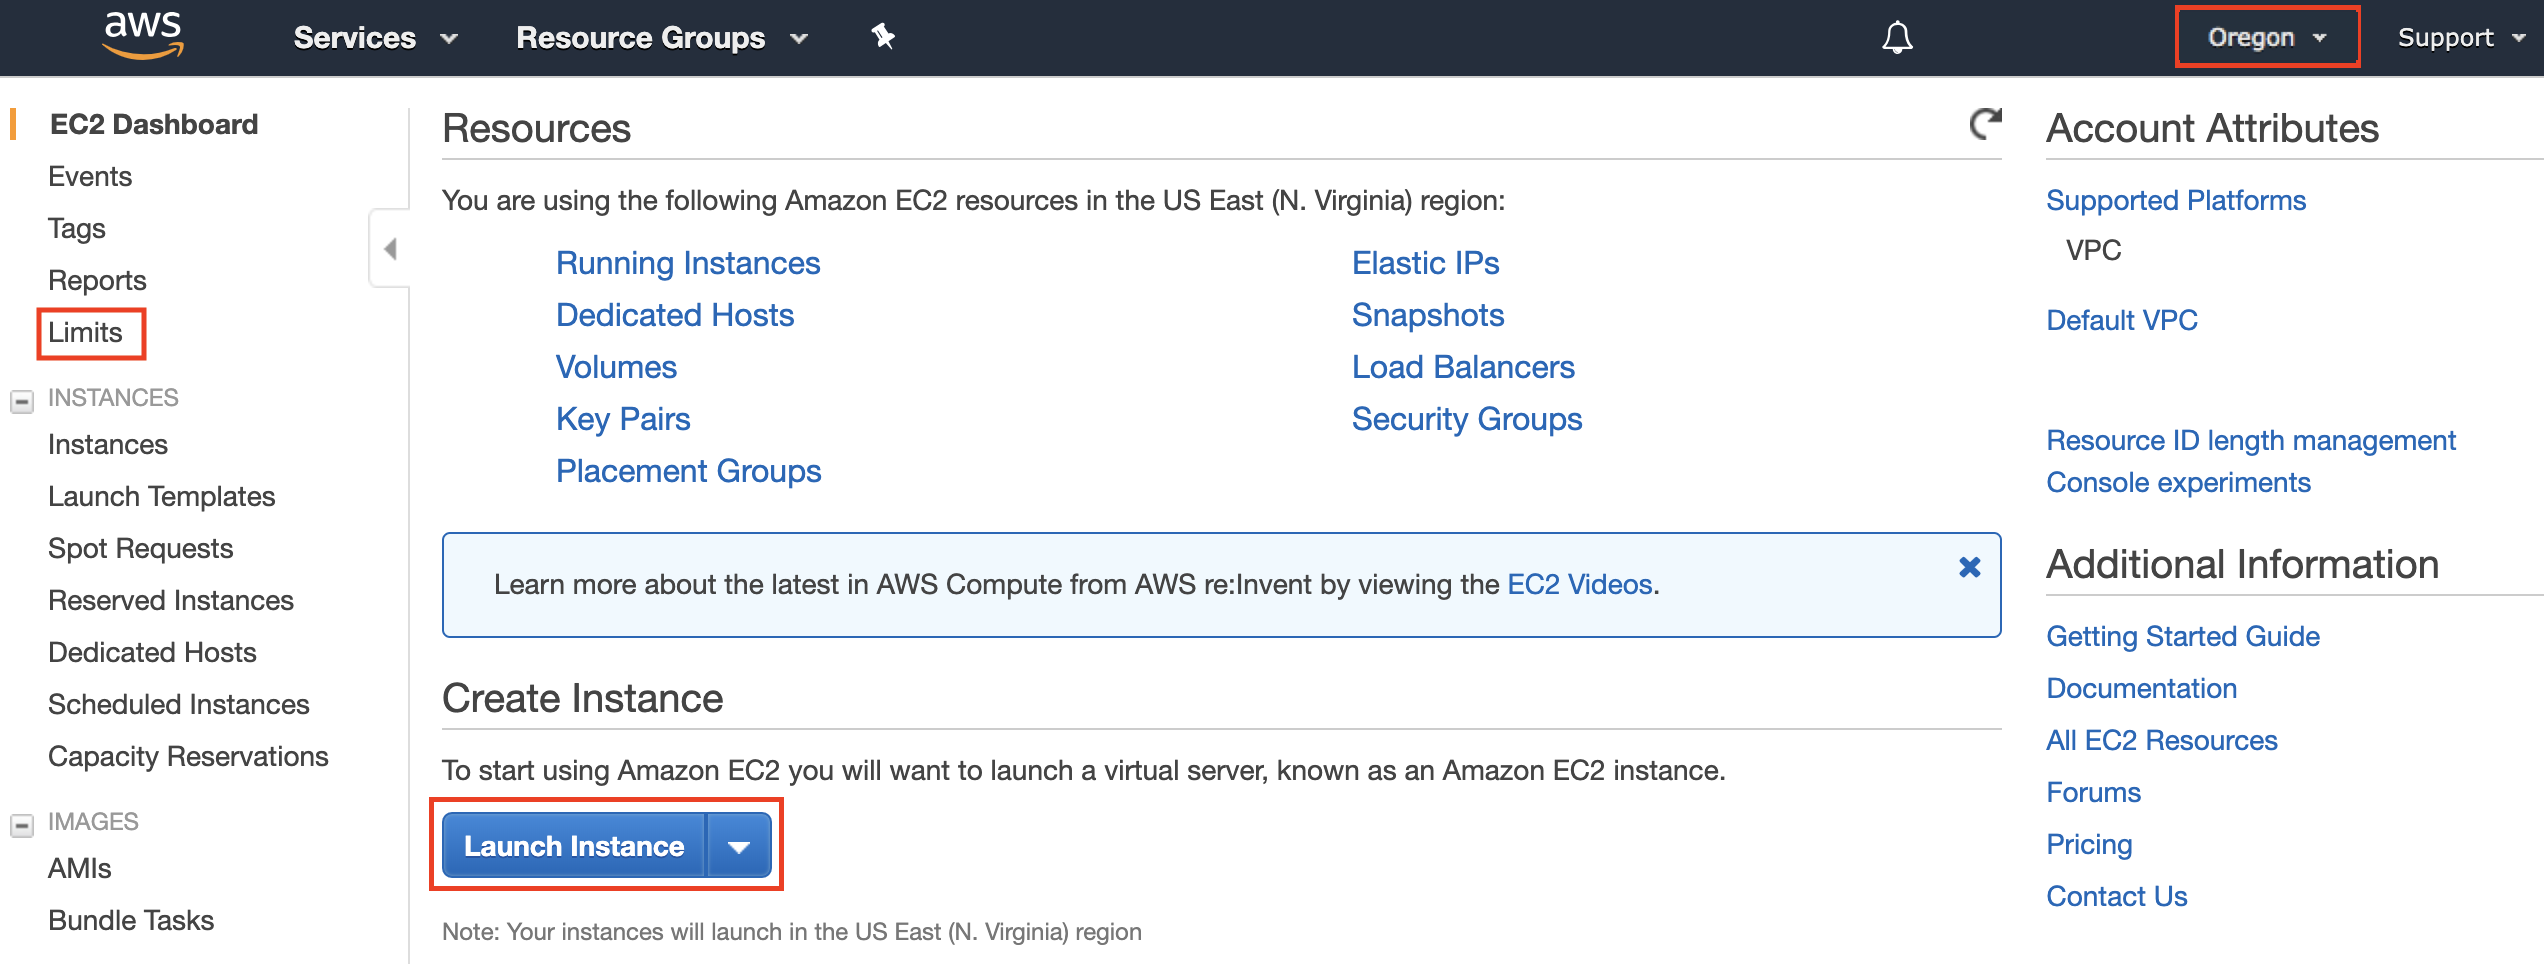
fig_ec2 shows the EC2 panel with sensitive account information greyed out.
Presetting Location
Select a nearby data center to reduce latency, e.g., "Oregon" (marked by the red box in the top-right of fig_ec2). If you are located in China, you can select a nearby Asia Pacific region, such as Seoul or Tokyo. Please note that some data centers may not have GPU instances.
Increasing Limits
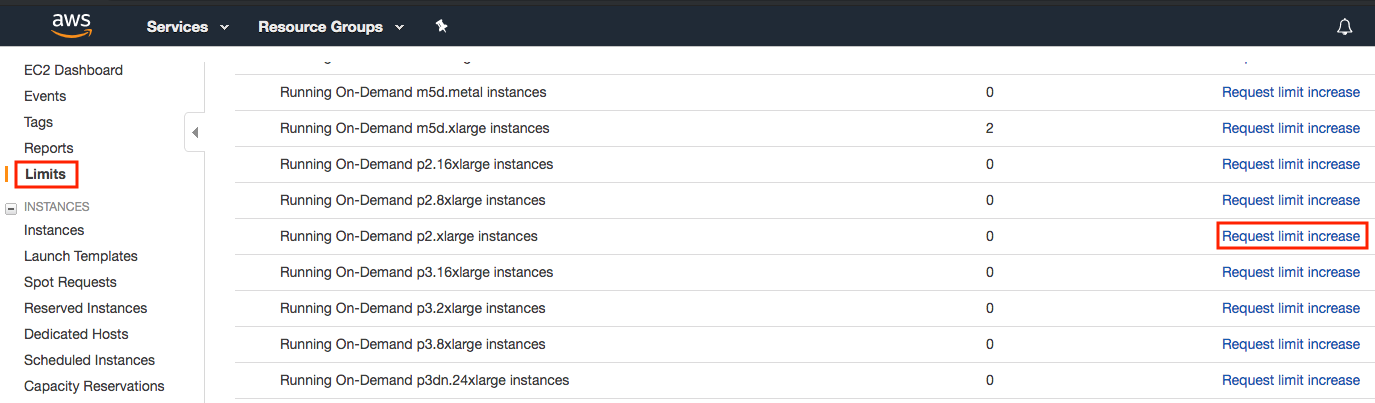
Before choosing an instance, check if there are quantity restrictions by clicking the "Limits" label in the bar on the left as shown in fig_ec2. fig_limits shows an example of such a limitation. The account currently cannot open "p2.xlarge" instance per region. If you need to open one or more instances, click on the "Request limit increase" link to apply for a higher instance quota. Generally, it takes one business day to process an application.
Launching an Instance
Next, click the "Launch Instance" button marked by the red box in fig_ec2 to launch your instance.
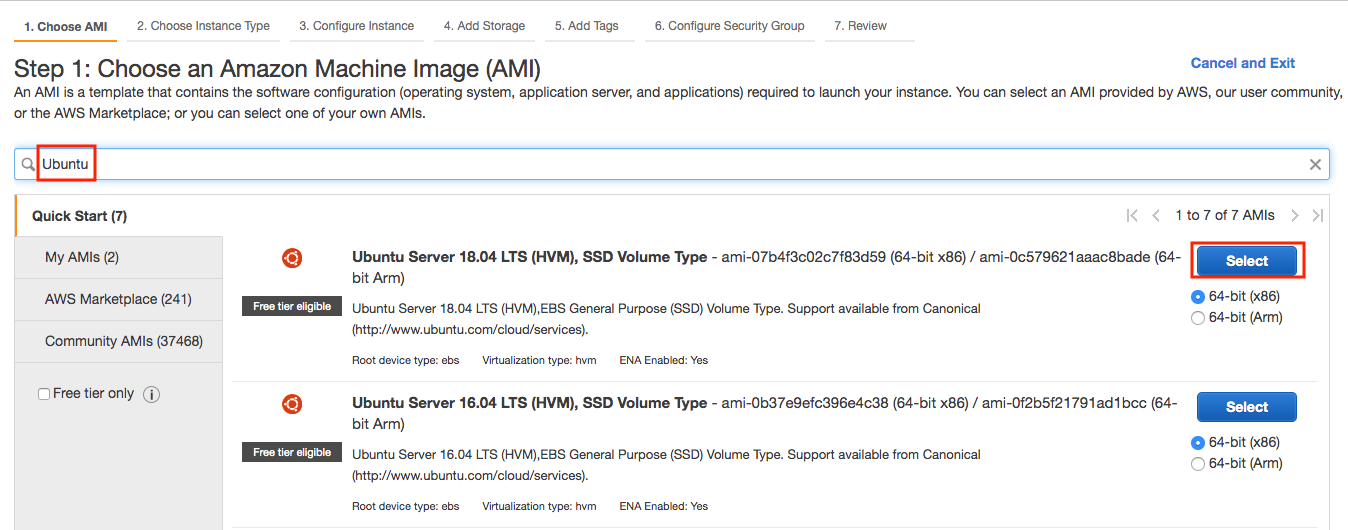
We begin by selecting a suitable Amazon Machine Image (AMI). Enter "Ubuntu" in the search box (marked by the red box in fig_ubuntu).
EC2 provides many different instance configurations to choose from. This can sometimes feel overwhelming to a beginner. tab_ec2 lists different suitable machines.
:Different EC2 instance types
| Name | GPU | Notes |
|---|---|---|
| g2 | Grid K520 | ancient |
| p2 | Kepler K80 | old but often cheap as spot |
| g3 | Maxwell M60 | good trade-off |
| p3 | Volta V100 | high performance for FP16 |
| g4 | Turing T4 | inference optimized FP16/INT8 |
All these servers come in multiple flavors indicating the number of GPUs used. For example, a p2.xlarge has 1 GPU and a p2.16xlarge has 16 GPUs and more memory. For more details, see the AWS EC2 documentation or a summary page. For the purpose of illustration, a p2.xlarge will suffice (marked in the red box of fig_p2x).

Note that you should use a GPU-enabled instance with suitable drivers and a GPU-enabled deep learning framework. Otherwise you will not see any benefit from using GPUs.
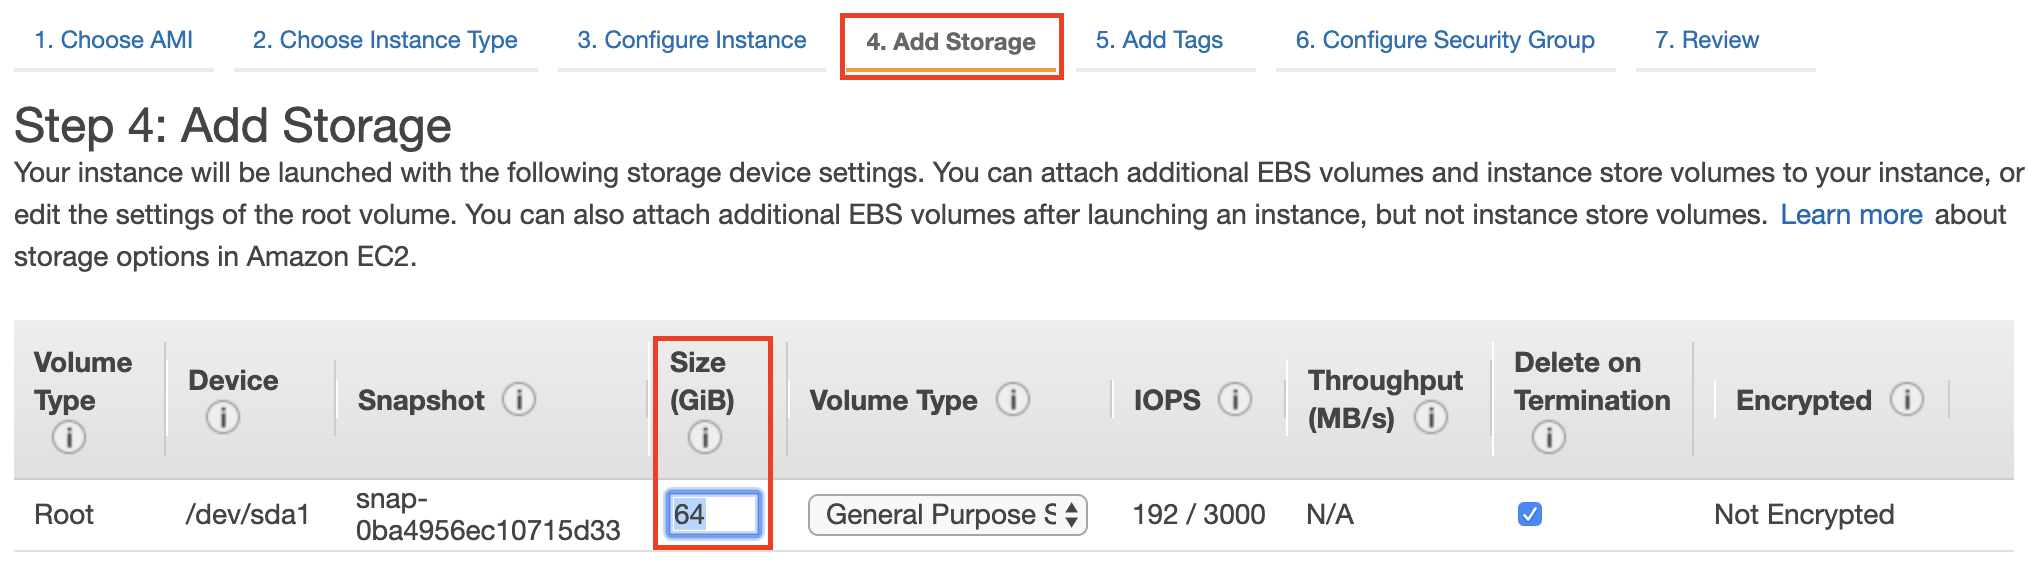
So far, we have finished the first two of seven steps for launching an EC2 instance, as shown on the top of fig_disk. In this example, we keep the default configurations for the steps "3. Configure Instance", "5. Add Tags", and "6. Configure Security Group". Tap on "4. Add Storage" and increase the default hard disk size to 64 GB (marked in the red box of fig_disk). Note that CUDA by itself already takes up 4 GB.
Finally, go to "7. Review" and click "Launch" to launch the configured instance. The system will now prompt you to select the key pair used to access the instance. If you do not have a key pair, select "Create a new key pair" in the first drop-down menu in fig_keypair to generate a key pair. Subsequently, you can select "Choose an existing key pair" for this menu and then select the previously generated key pair. Click "Launch Instances" to launch the created instance.
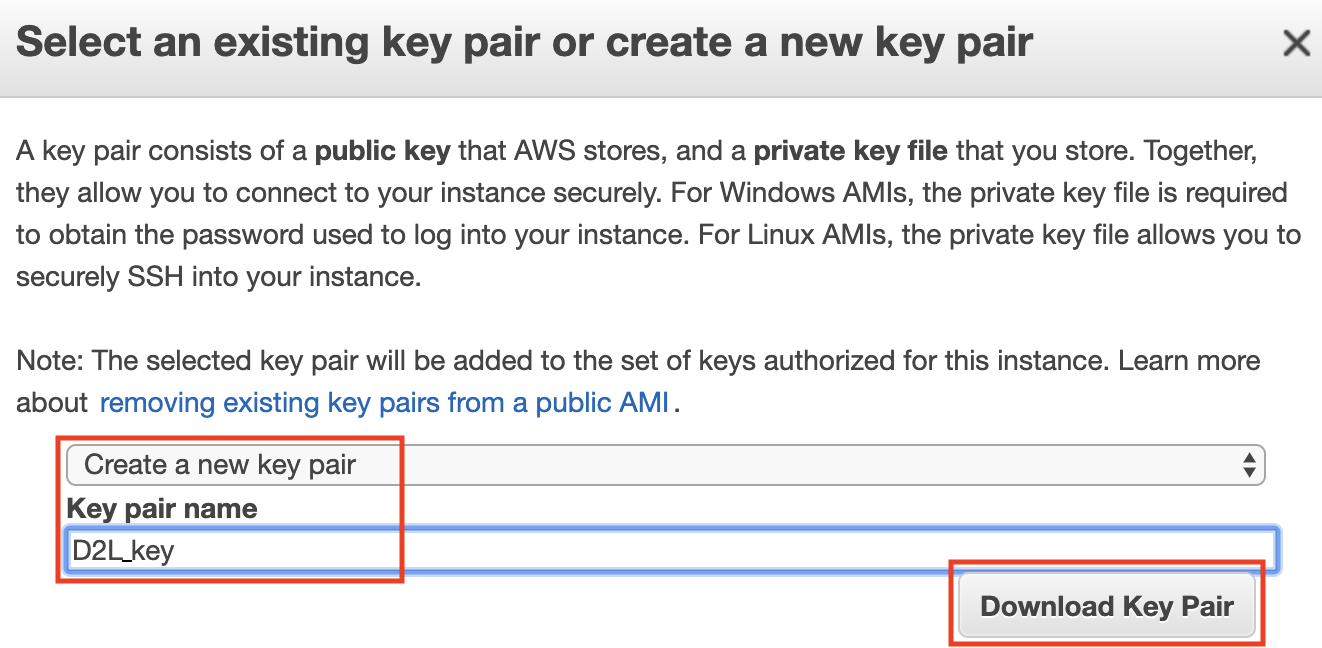
Make sure that you download the key pair and store it in a safe location if you generated a new one. This is your only way to SSH into the server. Click the instance ID shown in fig_launching to view the status of this instance.

Connecting to the Instance
As shown in fig_connect, after the instance state turns green, right-click the instance and select Connect to view the instance access method.

If this is a new key, it must not be publicly viewable for SSH to work. Go to the folder where you store D2L_key.pem and
execute the following command
to make the key not publicly viewable:
chmod 400 D2L_key.pem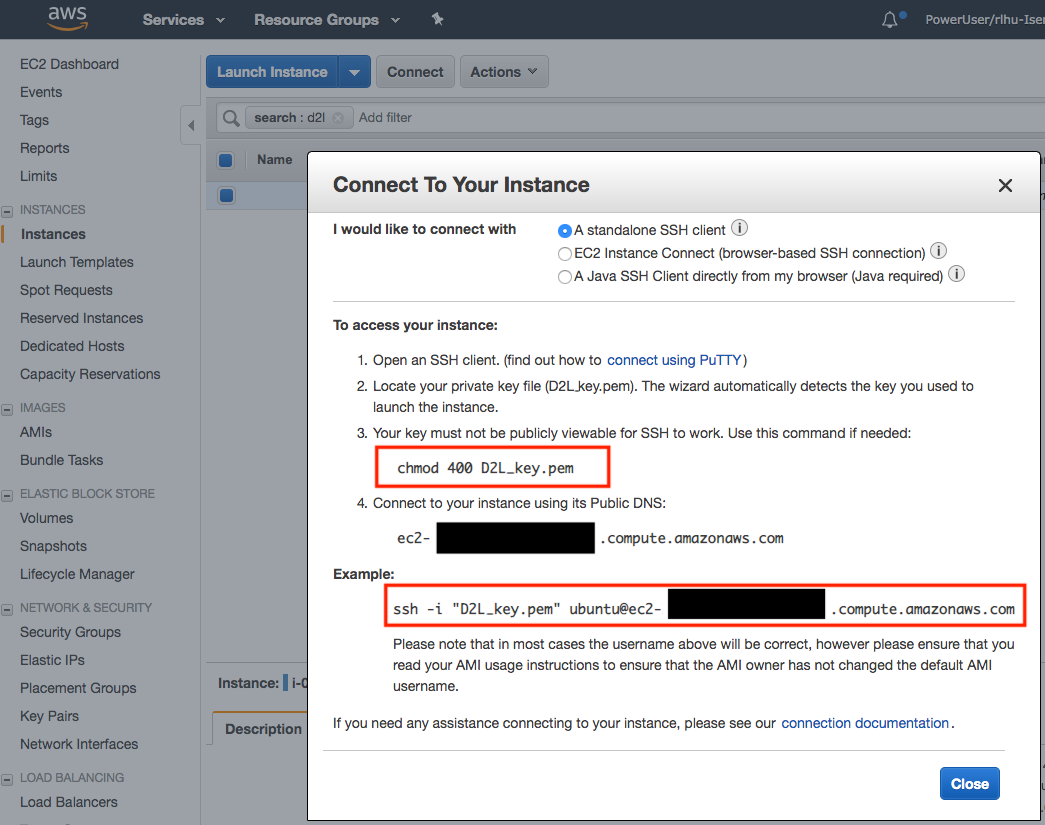
Now, copy the ssh command in the lower red box of fig_chmod and paste onto the command line:
ssh -i "D2L_key.pem" ubuntu@ec2-xx-xxx-xxx-xxx.y.compute.amazonaws.comWhen the command line prompts "Are you sure you want to continue connecting (yes/no)", enter "yes" and press Enter to log into the instance.
Your server is ready now.
Installing CUDA
Before installing CUDA, be sure to update the instance with the latest drivers.
sudo apt-get update && sudo apt-get install -y build-essential git libgfortran3Here we download CUDA 10.1. Visit NVIDIA's official repository to find the download link as shown in fig_cuda.
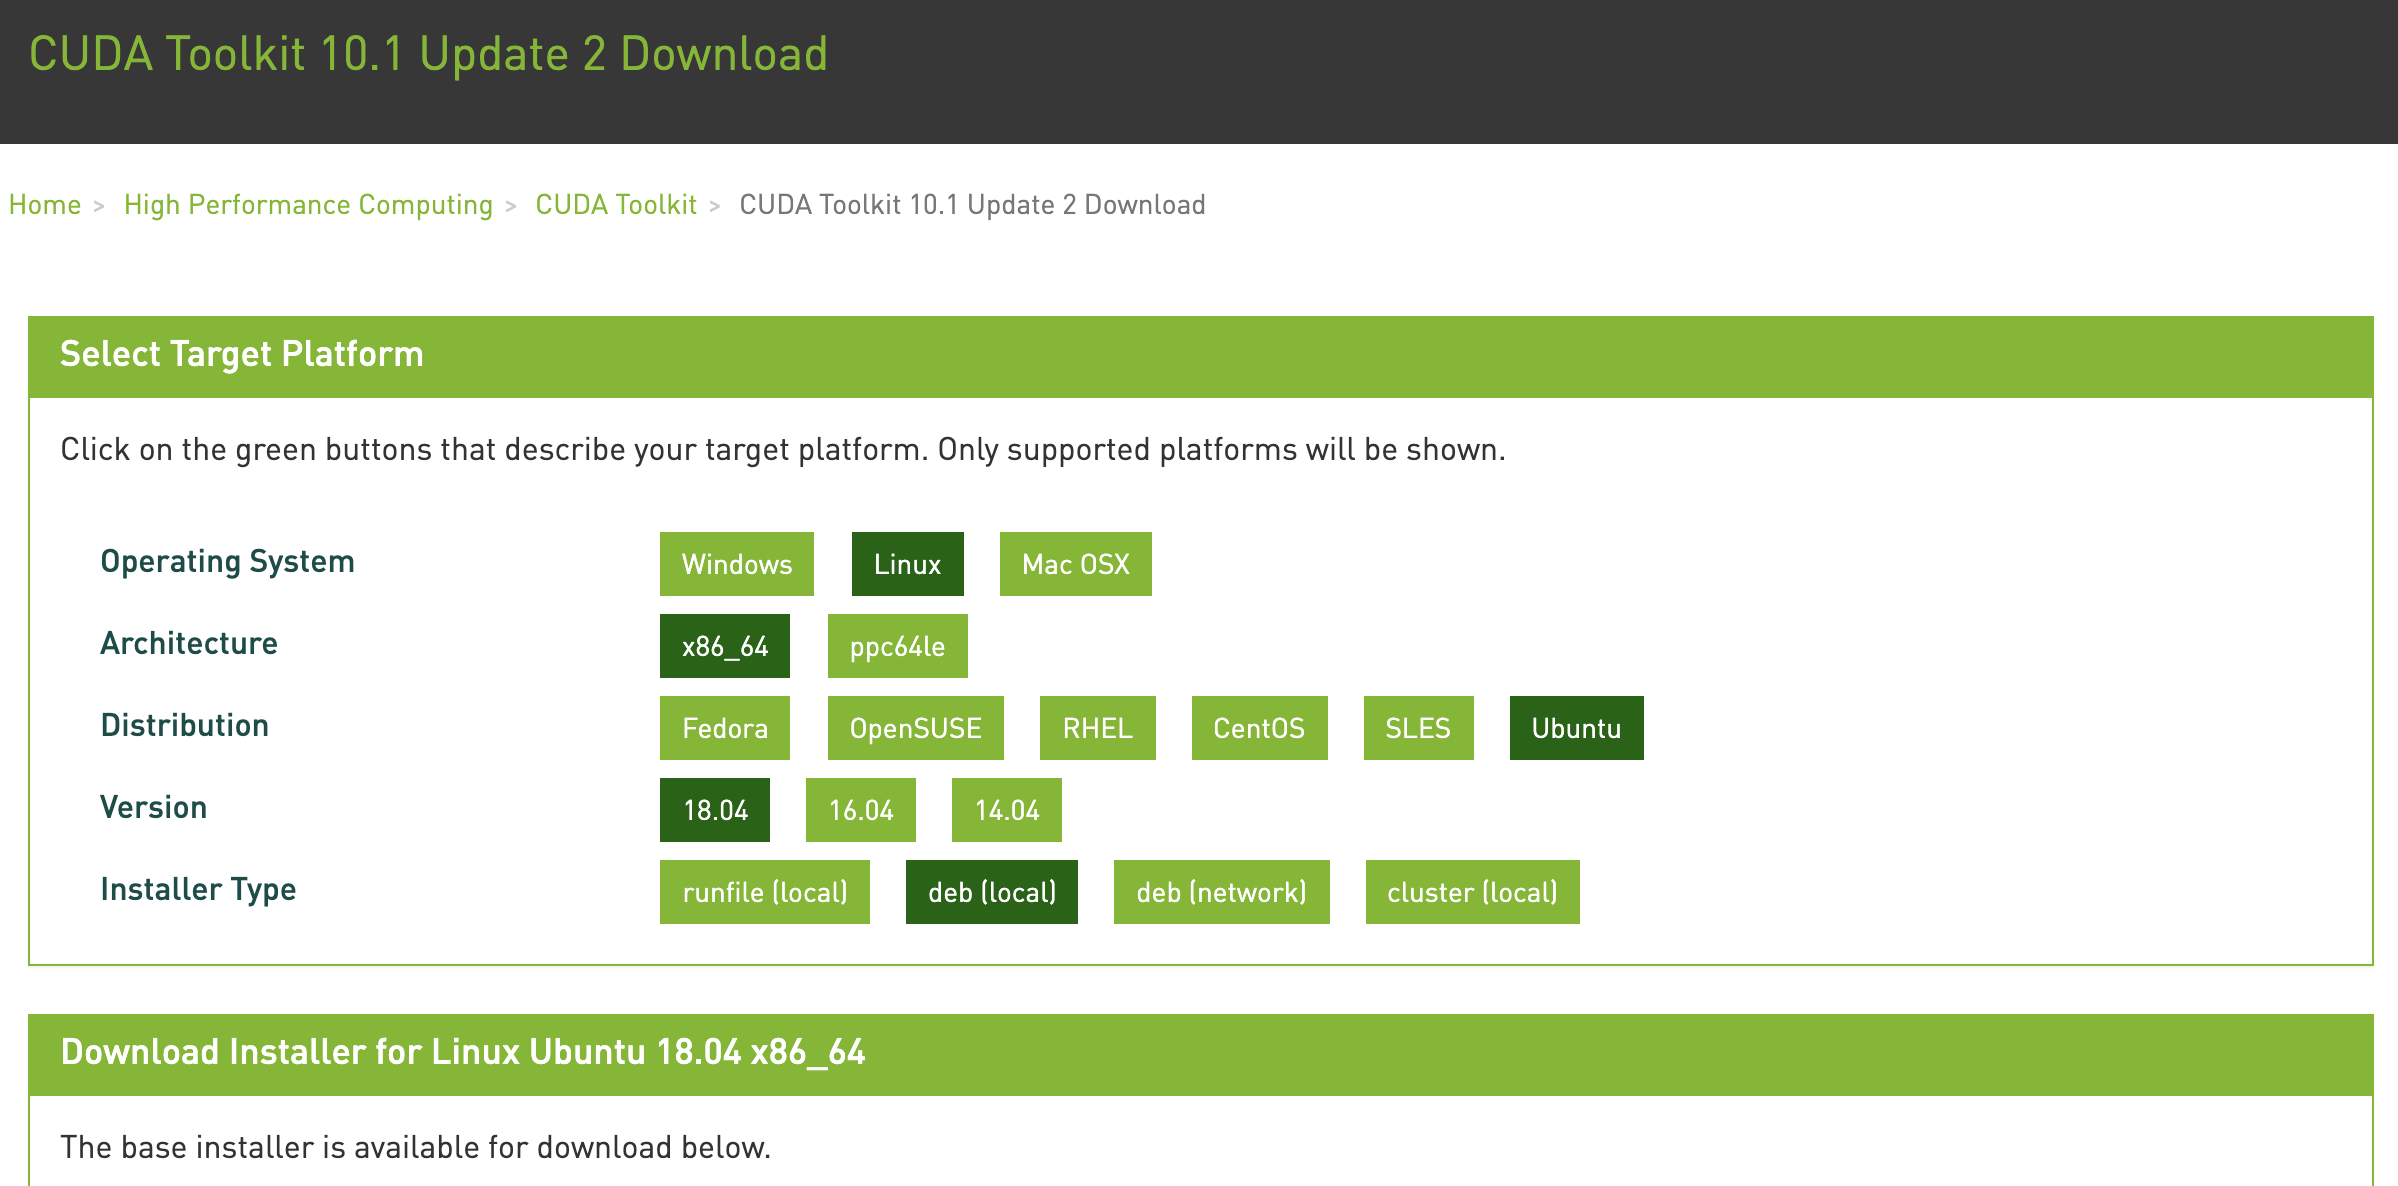
Copy the instructions and paste them onto the terminal to install CUDA 10.1.
# The link and file name are subject to changes
wget https://developer.download.nvidia.com/compute/cuda/repos/ubuntu1804/x86_64/cuda-ubuntu1804.pin
sudo mv cuda-ubuntu1804.pin /etc/apt/preferences.d/cuda-repository-pin-600
wget http://developer.download.nvidia.com/compute/cuda/10.1/Prod/local_installers/cuda-repo-ubuntu1804-10-1-local-10.1.243-418.87.00_1.0-1_amd64.deb
sudo dpkg -i cuda-repo-ubuntu1804-10-1-local-10.1.243-418.87.00_1.0-1_amd64.deb
sudo apt-key add /var/cuda-repo-10-1-local-10.1.243-418.87.00/7fa2af80.pub
sudo apt-get update
sudo apt-get -y install cuda
After installing the program, run the following command to view the GPUs:
nvidia-smiFinally, add CUDA to the library path to help other libraries find it.
echo "export LD_LIBRARY_PATH=\${LD_LIBRARY_PATH}:/usr/local/cuda/lib64" >> ~/.bashrcInstalling Libraries for Running the Code
To run the code of this book, just follow steps in chap_installation for Linux users on the EC2 instance and use the following tips for working on a remote Linux server:
- To download the bash script on the Miniconda installation page, right click the download link and select "Copy Link Address", then execute
wget [copied link address]. - After running
~/miniconda3/bin/conda init, you may executesource ~/.bashrcinstead of closing and reopening your current shell.
Running the Jupyter Notebook remotely
To run the Jupyter Notebook remotely you need to use SSH port forwarding. After all, the server in the cloud does not have a monitor or keyboard. For this, log into your server from your desktop (or laptop) as follows:
# This command must be run in the local command line
ssh -i "/path/to/key.pem" ubuntu@ec2-xx-xxx-xxx-xxx.y.compute.amazonaws.com -L 8889:localhost:8888
Next, go to the location of the downloaded code of this book on the EC2 instance, then run:
conda activate d2l
jupyter notebook
fig_jupyter shows the possible output after you run the Jupyter Notebook. The last row is the URL for port 8888.
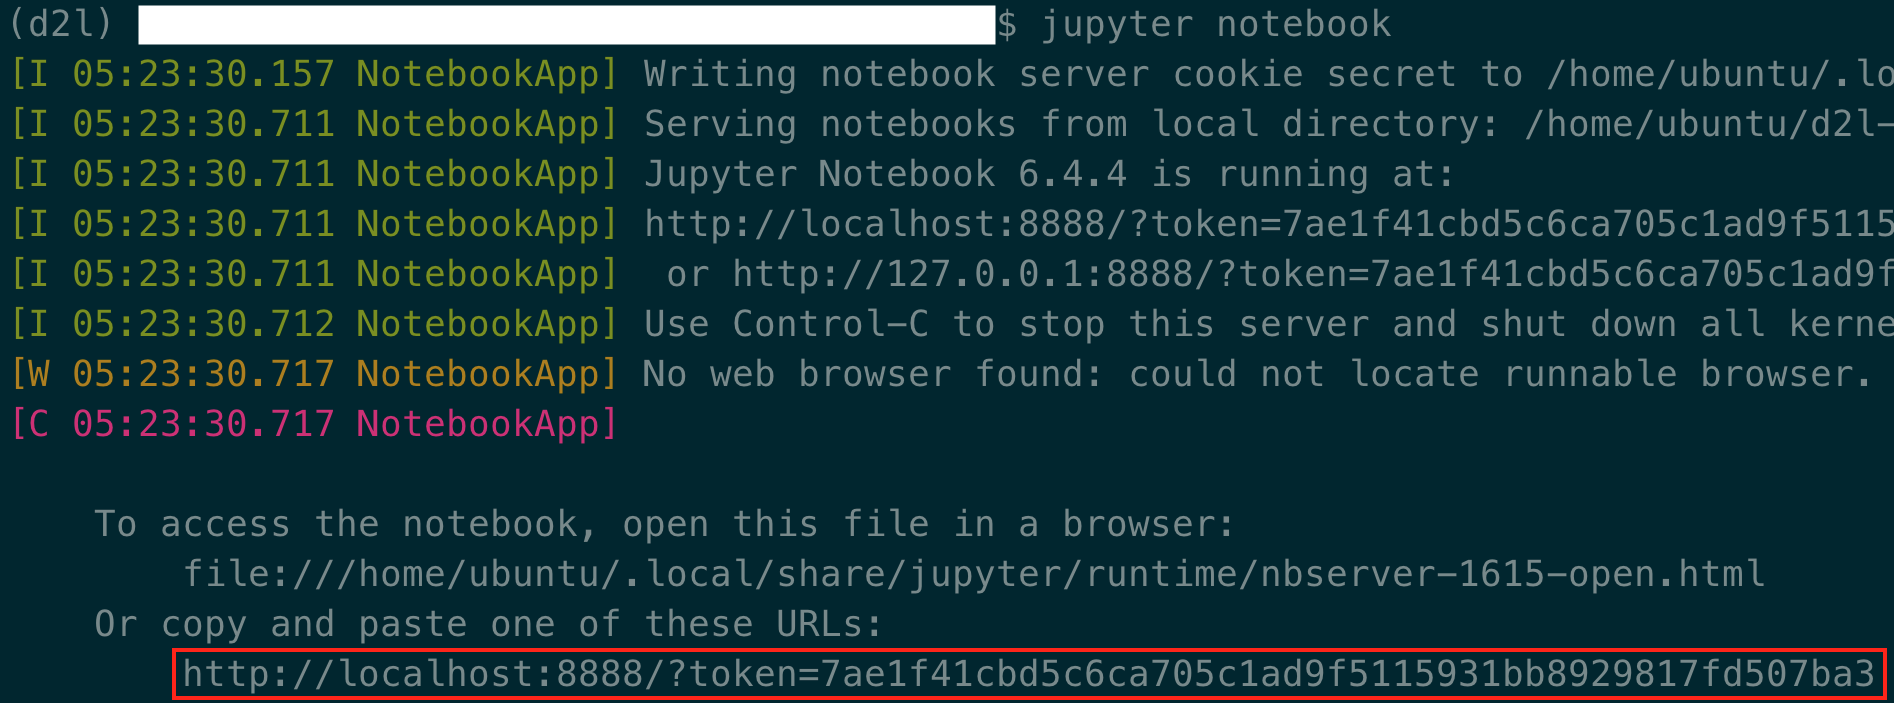
Since you used port forwarding to port 8889, copy the last row in the red box of fig_jupyter, replace "8888" with "8889" in the URL, and open it in your local browser.
Closing Unused Instances
As cloud services are billed by the time of use, you should close instances that are not being used. Note that there are alternatives:
- "Stopping" an instance means that you will be able to start it again. This is akin to switching off the power for your regular server. However, stopped instances will still be billed a small amount for the hard disk space retained.
- "Terminating" an instance will delete all data associated with it. This includes the disk, hence you cannot start it again. Only do this if you know that you will not need it in the future.
If you want to use the instance as a template for many more instances, right-click on the example in fig_connect and select "Image" "Create" to create an image of the instance. Once this is complete, select "Instance State" "Terminate" to terminate the instance. The next time you want to use this instance, you can follow the steps in this section to create an instance based on the saved image. The only difference is that, in "1. Choose AMI" shown in fig_ubuntu, you must use the "My AMIs" option on the left to select your saved image. The created instance will retain the information stored on the image hard disk. For example, you will not have to reinstall CUDA and other runtime environments.
Summary
- We can launch and stop instances on demand without having to buy and build our own computer.
- We need to install CUDA before using the GPU-enabled deep learning framework.
- We can use port forwarding to run the Jupyter Notebook on a remote server.
Exercises
- The cloud offers convenience, but it does not come cheap. Find out how to launch spot instances to see how to reduce costs.
- Experiment with different GPU servers. How fast are they?
- Experiment with multi-GPU servers. How well can you scale things up?